Thursday, May 30, 2013

A Cinco de Mayo or Summer Fiesta DIY Decor


I made these little pinatas for the kiddy guests. I used a toilet paper roll, wrapped some fringed colorful crepe paper around it, and filled with candy and confetti. I put a pull string at the bottom but they didn't pull too well. But they were cute and contributed to the festive decor perfectly!


I know it's been almost a month since Cinco de Mayo- but I decided to share these pictures now because a lot of these ideas are easy and fun to diy for a summer fiesta anytime!  Here are just a few small things you can make in a jiffy to liven up a fiesta celebration! Enjoy!


The tissue paper flower backdrop was created last year for my daughter's birthday party and I had been using it to add color to my craft room here. I think it fits in pretty well here! And in the picture on the right you can see the colorful cut out banners hanging above. 


The colorful striped bamboo runner is actually three dollar store place mats. Aren't they adorable? You can find the neatest things at the dollar store sometimes and these place mats will be used again and again! Love em!


The  coffee filter rolled flowers on the table are from this post here.


Looking back at these pictures, I realize how much I just loooove colorful tissue paper! I buy a bunch whenever I stop at the Dollar Store to keep my supply from diminishing. You just never know when you'll need them! I'd say they're a necessity for any kind of party decor especially when you don't want to invest too much in decorations that'll be used temporarily. 


Here's our makeshift photo booth wall. I snipped some colorful streamers, twisted them and taped them to the wall with some balloons. Simple and effective in creating a temporary backdrop for some festive pics! You'll see a few of them at the bottom! 
The printables and photo props are from The Dating Divas. 


Aren't they just so freakin' adorable?! The kids loved the photo props and I've packed them away to reuse for another fiesta photo booth. Best free thing I've printed off the internet this month! =) And yes, I think I'll always have a photo booth at every party now. I think it's a great excuse to take a break from hostessing and take pictures of everyone enjoying the party. 

We did some kiddo activities at our Cinco de Mayo fiesta as well but I didn't take pictures! =( The girls made tissue paper flowers and tied them to hair clips to wear in their hair and the boys decorated sombreros made from a paper plate and bowl. They enjoyed the little activities- but mostly, we just enjoyed having good friends over and making new memories! 

Follow on Bloglovin

Tuesday, May 28, 2013

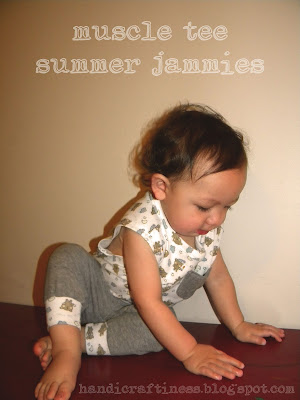
A Little Guy's Summer Jammies

Yay- something for the boys finally! Sewing for boys is a bit more challenging than it is for girls- mainly because girls fashions just have so many more options and boys are stuck with a handful of variations of shirt, pants, or shorts. Today, I'm featuring a pair of adorable pants that are from Heather from Feather's Flights. They're called the Perfect Playtime Pants and they are so easy to make! That's why I thought I'd use this opportunity to show you how I used her pattern to make some cute lounge jammies for my little guy. I tested her pattern and found it to be quite flawless and straightforward. If you're a beginning sewist, this little project is instant gratification! Pants are not as difficult to make as one would think- and this pattern can be made into three different types of bottoms! Those are my favoritest kinds of patterns and it's nice that more and more are becoming "multi-tasking" patterns like this!

I even stitched on a cloud applique to the butt of the pants! I know it probably looks more like an amoeba, but I'm calling it a cloud.


I made a muscle tee to pair with the pants- you know, so he can show off those guns of his. Boys like to do that, I think.


He's not the most obliging model I've worked with, but he does do some cute stuff...


Like eat stuff he's not supposed to. By the way, aren't the cuffs on the pants so adorable? I like cuffs! And I like the shape of the pocket too. I should've made two of them but I got lazy. Besides, babies don't use pockets anyway, do they?


I made the pants from an old pair of jersey lounge pants that his daddy was going to donate. I saw them in the pile and swooped down to save them before they took off and became someone else's treasure. There was a lot of material on those pants! It was an XL even though his daddy does not wear XL pants. I really don't know what that's about! I still have enough material to make another pair too.


Another view of the amoeba cloud. The good night teddy bear material is an interlocking knit that's so smooth yet firm and stretchy. It's probably the easiest knit I've sewn with thus far. 

I think he's adorable in these pants! He can move around so easily- as you can probably tell by these pictures. He's always in motion and having a good comfy pair of pants is necessary for all the moving around that this kid does! This pattern was tested by me and kid-approved by my little guy! I'm off to make the knickerbocker version. Happy sewing!


Follow on Bloglovin

Monday, May 27, 2013

Upcycled Rainbow Romper

I love a successful upcycled outfit! Especially one that you can barely tell was upcycled from something old! This rainbow romper is one that could be chalked into that category, I think! In a flurry of excitement and anticipation, I completely forgot to take a picture of the before: just a simple Old Navy rainbow-striped knit sundress that I've had for 6+ years and couldn't bring myself to donate because I loved the striped print too much. And now that I'm on a roll with this upcycling/refashioning thing, I thought I'd give it another go and see what happens.

I love rompers in the summer time and so when I dug the dress out of my "To Upcycle" bag, I immediately envisioned a romper. Not just any romper, but a bubble romper. I'm loving the bubble shorts- skirts- tops trend right now. It's adorable and comfortable and very easy to achieve with a little elastic.


Rainbow stripes + romper + bubble silhouette= uber cute, right? Throw in some Photoshop doodles and it's instant eye candy for all to enjoy! =)


Here's a back view of the romper. Same as the front, minus the rosette. The pink bodice is a ribbed knit fabric that I found at the Goodwill. I think I got about two yards worth for $3...I love my local Goodwill- someone's always donating awesome fabric there!

I simply cut an unfinished strip of the pink knit to make a quick sash for her tiny waist. The pink knit is stretchy enough for her to just open the neckline and step into like a skirt. I love stretchy fabric- no buttons or zippers to deal with, right???

Peek-a-boo! To be honest, she hated the elastic at the hem of the shorts. I don't know why! They're not too tight but she kept wanting to pull them down to her knees. That would've ruined the whole bubble effect I was going for! She knows all about the bubble effect- she loooves her bubble skirts so I don't exactly know why she didn't like the bubble shorts. But anyway- she's adorable in this romper and she'll wear it AT LEAST once more this summer before it gets passed down to a younger cousin. That's what I'm hoping for anyway! 

Now I really need to get working on stuff for my boys! I recently went through all the kids' clothes and realized my baby boy only has three pairs of shorts for summer! That might be enough for older kids but babies are messy and I don't want to be doing laundry when I could be outside enjoying some warm weather! Luckily, dad had some old stuff he was going to donate and I snuck some stuff out of his pile to upcycle for junior. I'll show you what I made with those another time! 


Joined the link party at Feather's Flight blog! Go check out all the other handmade stuff- so inspiring!
Linked up to Sew Can Do's Monday link party.
Find me here at Create.Craft.Love's link party!
Find me here, as well as hundreds of other awesome upcycles!


Follow on Bloglovin

Wednesday, May 22, 2013

A Colorful Bohemian Retro Refashion!

Today was a gloomy day outside. After having experienced some gorgeous springy weather the last week, this week's cold and clouds has been kind of disappointing. But it also forced me to stay inside and do some reorganizing and planning for future sewing projects. A refashion was on my list- especially since I have bags and bags of old clothes sitting under my craft table just waiting to be turned into something useful and adorable. Luckily, inspiration struck when I saw these two fabrics stacked together: 

A long bohemian skirt and a '70s muu muu dress.

It's like they were meant to be together, right? I definitely thought so!


And this is what I made with those pieces. A Bohemian Retro refashion/upcycle that my daughter actually likes! I love peasant tops for summer and of course, skirts and dresses are essential summer pieces so I married the two and came up with this fun look.


I even created some rosettes: one for the neckline and three more for the apron.


So here's how quickly it came together: 

1. Cut out the four pieces for the peasant top. Two for the bodice and two for the sleeves. You can find free peasant top patterns online with the help of sites like www.craftsy.com or a new pattern place I love spending hours on is www.sewset.com. I've found several patterns on both sites that I'm going to eventually try out- they're both endless sources of inspiration, in addition to Pinterest, of course!

2. Line up the curves of the sleeves with the curves on the bodice and sew together, making sure the right sides are facing each other. This fabric was a sheer woven cotton so I kept having to double check that I was sewing it correctly.

3. Next, fold down the neckline twice to create a casing for the 1/4" elastic. Sew it down leaving a two inch opening to insert the elastic, run it through and sew it together. Stitch close the casing and then finish your sleeves the same way with elastic. In my case, I merely hemmed the sleeves because my daughter hates sleeves that squeeze in on her arms. Now the bodice is complete so on to the skirt.

4. After measuring how much I needed for the skirt, I snipped down the length of it from the elastic waistband at the top, making sure to hold on to the elastic so that I didn't lose them. I pinned the new seams together and sewed up, creating a much smaller skirt from the large one.  

5. I gathered the bottom of the bodice to make it the same size as the skirt. With the skirt right side out and the top inside out, I inserted the skirt up through the neckline and lined up the edges. Sew together and finish all the seams as needed.

6. Yay! Just made a dress! But it needs something more...right?

7. So I added a pink apron with an overlay made from the bottom of the large Bohemian skirt. I created more matching rosettes and hand sewed those in a cluster at the top corner of the apron and sewed another one in at the neckline.

And here she is modeling her fun new look for us! Sorry about the messy hair- this was right before her bath so we weren't about to doll her up just to undo all the work right after our photo shoot.


Seriously- what's more fun & easy to wear in the summer than an easy pull on peasant dress? It's also colorful (obviously) and Bohemian cool- just full of personality, isn't it?

 I love the fabric rosettes. I'm going to be making more and turning them into a fun ribbon necklace that can also be worn in her hair.


Isn't it cute? My favorite refashion ever! I'm now more inspired than ever to go through those bags and bags of clothes and making some unusual pairings with the fabrics! This one was so fun and fast, I could make one for each of the girls in my family in just a week! Imagine how colorful that family picture would be, huh? =) Looking forward to it! Happy sewing all!

Follow on Bloglovin

Friday, May 17, 2013

A DIY Faux Romper

I finally got around to making stuff for myself! My daughter demanded that I quit making clothes for her because she has enough right now. But I really think she's just tired of fittings and re-fittings and photog sessions. It's not like she was overworked- she just doesn't seem to have the patience for the long hours it requires to be a supermodel. ;-)

On the other hand, I was able to make something that I'd been thinking about for awhile: a romper. I love rompers for lounging around in and since I just received my order of gorgeous soft knits from Girl Charlee Fabrics, I knew it was a sign to start on it! The bad thing about rompers: too much work involved in going to the bathroom (you have to strip completely naked! eek!) and going to the bathroom is already difficult with a baby balanced on one hip, right moms??? Sooo- I decided to make a faux romper: two easy, comfy pieces that can be worn together to look like a romper or if I want, I can also mix them up with other pieces to create a new look when I get bored. Who doesn't love mixing & matching cute loungewear???

 For my faux romper, I used a yard of the Vintage Revival chevron cotton jersey blend knit fabric from Girl Charlee- and I gotta say- their fabrics and prints are THE BEST! Soft, stretchy, colorful, and comfortable- I'd buy everything off that site if I could! And their prices are so affordable, I'd highly recommend going there for your knits before heading out to the fabric store or going to another online retailer!


In addition to the chevron jersey knit, I also used a purple linen fabric for the neck tie and the back of the shorts. I love mixing fabrics, prints, and textures and this little project was no exception. Well, that and because I had only ordered one yard of this fabric not really knowing what I'd want to make with it yet. But I absolutely love the purple linen with the chevron print!


The halter neck top is so easy to make- you probably wouldn't even need a pattern for them! All you'd have to do is measure the width of your chest, your waist and figure out how long you want it to be. Make curves for the neck and armpit area, figure out how much seam allowance you want and you're pretty much set. The back piece is simply a rectangle with encased elastic at the top hem to keep the top fitted to your body. Once the entire top was sewn together, I wove an elastic band into a casing at the bottom hem for a more fitted look.


I think the shorts are my faaaaavorite piece! I used another pair of shorts I liked as a pattern for these and they turned out even better than the store-bought pair! Funny how that happens sometimes, hmm? For lounge shorts, there should always be extra room for your bum because you sit around a lot and you don't want it riding up or falling too low, do ya? To make them deeper, cut the back pattern piece longer in the crotch area. See how in the above picture even though the shorts are laid flat, the purple linen comes forward and isn't laying perfectly behind the front of the shorts? That's what you want if you've got a curvy behind. I made my own pattern for these but since they're elastic-waisted, I can easily use the same pattern if I were to make any for my sisters, who are about the same build as I am. I can always decrease or increase the amount of elastic to accommodate their waists.


Tuesday, May 14, 2013

A Handmade Wardrobe- Part Two

Hello again! As promised, I've returned with some more pieces of my daughter's expanding handmade summer wardrobe! I'm kind of annoyed at the moment because Blogger completely erased my original text to this post when I was trying to preview it. I saved after every paragraph and yet, everything got dumped and disappeared on me so I have to re-write it again! Grrrr.... But enough of that- I will try to remember what I wrote before and hope that it doesn't happen again!
Anyway- my daughter and I have been agreeing on a lot of the same styles and silhouettes but our only sticking point is the color pink. If I let her dress herself, it's guaranteed that she'll look like a walking bottle of Pepto Bismol. Now, to her, this is pretty so I let her get away with it every now and again but in an effort to expand her interest into other colors, I made mostly non-pink, but still pretty, pieces. Luckily, she has ended up liking most of them...except for the "boy-fabric" shorts from the previous post! But other than that, she's accepted everything else I've made for her! She is this difficult with new foods, too! Life must never be made easy for moms, right? Well, at least in this case, I've come out on the winning side and now I'm going to show you how I did that!


This bubble dress is my absolute favorite of all the dresses I've made for her. The fabrics were found at the Goodwill and for about $2, I was able to create an adorable look that's also comfortable. The back has three pieces of encased elastic that stretch to make it easy to pull on or off. The fewer buttons and zippers I have to deal with, the better! The elastic at the hem also allows her to walk or run freely and doesn't hamper her one bit.


We both love the bubble skirt effect, as evidenced in the next piece!


She received plenty of compliments at the mall yesterday when she wore this little number out. Nothing is more ladylike than lace and when used in a bubble skirt, it's just so darn pretty, isn't it?


We paired it with a peter pan-collared sleeveless blouse in a dainty floral print (also thrifted fabric, by the way) and the look was very ladylike indeed when worn with blue ballet flats. 


I love modern ladylike pieces for girls. It's just too darling.


This tunic was upcycled from cloth napkins that I discovered at the Goodwill for just .99 a piece! So I scooped up all four that they had on hand and used two of them to make a little tunic for her. Don't you just love that pretty floral print on the blue background? I also love that K is small enough to use just two napkins to make an outfit. Outrageous, isn't it? I'd love it if I could do that too!


I didn't even need to sew the hem- just used the original finished napkin hem and sewed up the sides. Quickest upcycle I've ever done! With a little ric rac trim and pink buttons, it was heartily approved by my daughter. Makes me wonder what I'll do when she gets bigger? And I also had to wonder who would throw out such beautiful cloth napkins?! I have two more to use for another project but for now, I plan to work on sewing projects for my boys. That's always a challenge but it'll keep me busy for awhile! Hope you found some inspiration here for your little girl! Happy sewing all!