Saturday, June 29, 2013

Little Ladies July 4th Dresses


I know I was supposed to wait to get pictures of my models in these adorable dresses but I just couldn't wait to share them with you! 


These are two beautiful red, lace, and blue dresses that I made for my two youngest nieces for their family picture day. Since it was also close to July 4th, we (my sister and I) went with a patriotic color theme.


The lace upper bodice on this first dress was a style my sister really loved so I decided to recreate it with a bit of leftover lace I had on hand. 

Then she also mentioned that she liked color-blocked dresses so I applied that idea to the overall design as well. Adding the navy fabric to the dress also kept it from looking to Santa-ish. Nobody wants to be reminded of snow and Christmas in July, do they? =)


That lace bow is just perfect!


The double circle skirt is loose and swingy and will be so fun for my little pint-sized niece to twirl in!


This navy dress was inspired by this dress here. My sister found it on the Burlington website while window-shopping for ideas. She fell in love with it and I decided I could probably make it faster than she could find it in store. I had to pull an all-nighter to achieve that lofty goal but I did it! Hooray! =)


And the results are fantastic! The pictures are awful, I know, but the shiny navy fabric is so hard to photograph up close! But I will definitely post an update showing my little models in these adorable lady-like dresses so you can all see how beautiful they really are.


Now I probably have to pull another all-nighter to make a matching dress for my own little girl. I'm thinking lace peter pan collar and short twirly skirt? Maybe some tulle? Stay tuned to find out how her July 4th dress will turn out!

And to see these dresses on the models themselves, go HERE!

Monday, June 24, 2013

Some More Scrappy Chicness: A Quilt + A Boy's Outfit!

I had so much fun last week sewing a scrappy dress for my daughter but I ended up using only half of that scrap pile so I got ambitious and decided to make a personal picnic quilt for her as well. My daughter loves picnicking. She asks to go even when there's three feet of snow outside, silly girl. 

Up until now, she'd been using her paper thin baby blanket as her picnic blanket so I decided she deserved something a little newer and cuter. I love quilts these days! The creative possibilities are limitless! I plan to make one for each of my boys to put on the foot of their beds one day... I promise I will, I really really will! 


I also used some muslin to create a doll for her. Made the pattern myself, I did, yep! She doesn't take to dolls easily (she's intimidated by their blank glassy-eyed stare) but I've found that she likes the soft dolls as long as they don't have "those shiny eyes" as she puts it. I created the doll to resemble her and she loves it!

The picnic quilt used up the rest of the larger pieces of scraps I had leftover from making her dress. It's a simple quilt made of 10" squares and bordered with 3" wide matching scraps. I didn't use batting between the layers but the backing is a minky pink fabric (which I forgot to photograph, darn!) so the quilt is lightweight but still heavy enough that it won't blow away in the wind. 


I only created the one outfit with a shawl (or cape, according to K) for the dolly and when it came to bedtime, my daughter asked where her doll's jammies were. Oops! I may need to surprise her with one tomorrow if I can manage to fit in some sewing time today! And then, of course, the dolly has no shoes, she pointed out. Well, I have yet to learn how to be a doll's personal cobbler but I'll try working on that one also.


You may find this funny, as I did, but I actually had to Photoshop the doll's face and body. Haha! I really did because K had been playing outside with her for about an hour before the photo shoot and she had gotten all kinds of outdoor "crumbs" stuck to it that I couldn't brush or pick off easily. So yeah- she appears strangely flawless here and now you know why. =)


Ahh, two of my darlings. =) I got to dress them up in almost-matching outfits finally! I normally only do that at Christmas but I managed to eek out one for the summer just because! No holiday needed! 


They were so cute here, I had to collage the frames to share the action with you all. 


And indeed, this is a scrappy outfit for a scrappy little guy! I used leftover striped mint/white fabric to make the suspenders, back pockets, and bow tie for my little guy's outfit.


The shorts are made of an oatmeal linen that I picked up during a small thrifting expedition on Sunday. The shirt is a leftover cream colored knit that I sewed together without finishing the hem or arm/neck holes. I wanted it to have a scrappy chic baby feel to them. The shirt is loose and comfortable and stretches nicely over his big belly (don't be fooled by the awesome angle of the photo above- he really does have a big belly!)


The shortalls were inspired by a vintage kid's pattern I'd seen at the thrift store. Instead of buying the pattern, I figured I could recreate it myself and I did! I made the shorts pattern by tracing a pattern I had already but increased the size by an inch all around because I wanted them to be wide-legged shorts with a back elastic.


He's so darling in these vintage-inspired suspender shortalls- I'm excited to make him another outfit that I'll be featuring later this week! I'm discovering that sewing for boys can be as fun as sewing for girls! =)


And he's so happy in the homemades, warms my heart and inspires me to make s'more! Happy sewing and crafting everyone!

Follow on Bloglovin

Wednesday, June 19, 2013

How to Make Eggrolls in 10 Easy Steps!


Yep- just 10 steps to delicious, mouth-watering, crunchy, savory, addicting eggrolls! I wrote up this post some time ago for my HubPages and now I'm sharing it here with everyone because it's a great recipe that's quite in-demand at home and with the besties. =) All they ever ask for is eggrolls whenever we get together and no matter how many times I've shared the how-to (I even wrote up this post for them), they just want me to make them to share. 


The original post can be found here. I've even included pictures for each step and of each ingredient that I use. I know it's hard for some folks to get good, authentic Asian ingredients sometimes but I hear Amazon.com actually sells the stuff at a great price if you can't find them in your local grocery store.


I always make my eggrolls this way- same seasonings anyway. Sometimes I'll chop up some cabbage too but my kids are rather leery of too much "green stuff" so I usually don't do that too often. Otherwise, I'll end up eating about 50 eggrolls by myself and my blogger butt just can't handle that right now!

Anyway, I no longer have all the pictures on file for this post so head over to my other page using the above link and it's all there for you. I tried to simplify as much as possible so it's easy to follow. If not, leave me a message here and I'll answer as best I can! Hope you try them out- they're delish! And if you do, message me to let me know if I should change anything! Happy eating!

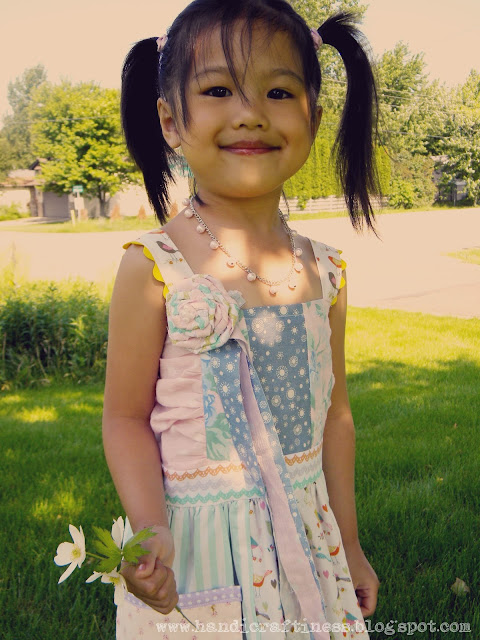
The Scrappy Chic Summer Dress


My big project this week was to make something out of the scrap fabric that I had sorted through last weekend. I basically just separated all of it into color groups and I ended up with EIGHT different piles of fabric! Crazy, huh? I needed to do something with all of them so I decided that over the next eight weeks, I'll take one pile and create something. 

This week, I decided to start with this pastel pile above. It just screamed summer dress to me and I'd always wanted to try piecing different fabrics together to make a quilt-like effect. I'm not so crazy about actually wearing a quilt but the idea of piecing different patterned fabrics together in the same color group was very appealing.

And this is what it turned into:

I'm calling it the Scrappy Chic dress- it's shabby chic looking with scraps! 


My daughter is obsessed with pink so this was right up her alley. Wonder what she'll think when I delve into the no-pink scrap pile? I'll have to make something for myself with those, I think!


I even used the scraps from making this dress to create a rosette with shabby strips to pin to the bodice. This was probably her favorite feature, other than the pink ruffle at the bottom hem.
Notice the yellow ric rac on the straps? I love ric rac so I'll always try to sneak them in somehow, some way, hehe. 


The bodice is ruched on both sides and the front is pieced. It was such a pain installing the back zipper! But I was not going to attempt buttons on the thin pink voile fabric!


The layered skirt is my favorite part. I love all the different fabrics working together to create a fun, sweet look that reflects my daughter's personality quite a bit. She likes the longer length too because it makes her feel like a princess. =) 


The fabric rosette and strips just makes the dress though. It's shabby chic and sweet.


She's pretending to be a prairie princess.


Her new favorite dress...until the next one, of course! I think my next scrappy project will have to be for the boys though. Gotta be fair to my two boys! They're not as good at modeling as my daughter, but  they still deserve some homemades, right?


Follow on Bloglovin

Sunday, June 16, 2013

Vintage Inspired Summer Playwear


I absolutely LOVE vintage children's clothes! They have simple but flattering lines and the colors are fun and attractive to children. This week, I decided to upcycle a pair of vintage pajama pants that I thrifted for around $5. It's the yellow/pink floral print on the playsuit seen above- and isn't it an adorably vintage print??? I fell in love with it on sight and knew I had to make something summery for my daughter out of the light cotton/poly material. Luckily, it was a size large so I had plenty to work with!


This is the pattern I used for the playsuit, pictured on the right. However, I didn't band the bottom hem because I learned from a previous experience (the rainbow romper) that my daughter hates anything scrunched around her skinny legs. So I left the hem loose and wide and sewed some rick rack trim around it instead. I think it still looks great and when she put it on, she loved the loose comfort of the entire outfit. I didn't photograph her as she wasn't home today (she totally lucked out and doesn't even know it!) but I think these pieces look great with or without a model in them! 


For the neck, I decided to make it even easier for her to slip it on by simply running some elastic through a bias strip and attaching to the shoulders. She simply stretches it out to slip her head through and no strings to tie and get knotted in her hair!


I love rick rack trim. 


And I love this print! I wish I could've found the matching top to the pants but I did have enough material to make a diaper cover for the next outfit- plus a little extra for a future project- yay!


This next one is a cross back pinafore dress/top. I made it for my daughter but then realized it would look wonderful as a dress on my younger niece so I made a diaper cover to go with it.


The top material is from some thrifted fabric. I also used it to make a rosette pin to enhance the diaper cover. I just think it's adorable!


I used the vintage lace trim from my previous thrifting expedition to edge the leg openings.


And added ruffles to the bum because a girl always needs those!


Just adorable, isn't it?


I love the cross back feature. It makes it easy to put on and can fit an infant as a dress on up to a 5/6 year old as a top- which means many years of use! 

Hope you enjoyed seeing my vintage-inspired playwear! I'm working on some fabric scrap projects later this week so I'm hoping that post will be up by Wednesday! Til then, happy sewing!


Find me here at Sumo's Sweet Stuff!
And here at Craft-O-Maniac Monday! Follow on Bloglovin

Saturday, June 8, 2013

Nifty Thrifty Addict


I have been doing a lot of thrift store shopping lately- or thrifting, as I like to call it. I've developed a huge addiction to vintage sheets, fabrics and notions and thrift stores have been helping to feed that addiction. My most recent purchases totaled a whopping $40 and I got 2 plastic bags full of bias tape and lace seam finishings; ribbons of different sizes and yardages; almost two yards of beautiful black lace; a bag of vintage quilting scraps (gorgeous colors, too); two beautiful great condition vintage sheets; and 28+ yards of knits, wovens and chiffons. Pretty nifty, huh?

I found a gold mine at a chain thrift store that's about a thirty-minute drive from where I live but it's well worth the trip and I'm thinking of making a monthly shopping trip there to find some treasure! And I thought, why not make it a monthly blog post as well??? I know I always enjoy seeing what others find at thrift and antique stores, not to mention garage sales, and who doesn't enjoy shopping and scoring great deals???

Check out what I scored for my first Nifty Thrifty feature:


I love all the fabrics I found but my absolute favs are the coral colored denim and the coral and turquoise gauze, which by the way, was ONLY 99 cents for the entire three yards! I'm contemplating making a floaty summer maxi dress with it...hmmm. The coral color is so hot right now for spring and summer! 

My favorite color is green as well so the jersey slub knit was an especially cool find. Just looking at all these fabrics is filling my head with future sewing projects! I'm certain you'll be seeing these fabrics very soon again in the near future!

Now check out the vintage notions I found to add to my stash:


And I just love how my little dollar store basket fits everything perfectly. If the collection/obsession continues to grow, I'm going to need a few more of these nifty baskets.  


I can't wait to put some of this fabric and notions to good use! By the way, the collage at the top shows the two vintage sheets I mentioned earlier- isn't that birch tree print on the top sheet sooo cool? I think I may just frame a section of it because I love all the colors! It's a piece of art- why would anyone wanna sleep on that? ;-) Anyway, happy thrifting everyone!