Showing posts with label diy party decor. Show all posts

Thursday, September 26, 2013

My Little Pony Grand Finale

Ok, ok, so I'm about five days late on this post but it'll be worth it, I promise! There's just so much to share from this fun little party we had this past Saturday, I don't even know where to begin! But I will begin with thanking my sister for helping with two days of prep and for doing the girls' hair and face paint/makeup. K especially enjoyed being all dolled up for her party and what makes her happy makes me happy!


Let's start with the decor...


I love the height the balloon topiaries give the table. Thanks to my awesome sister, A, for putting them together for me! I wrapped some colorful wrapping paper around some garden pots and once the topiary went in, I stuffed some fabric inside to keep it upright. 


On the wall above was this cute picture my other fab artistic sister, C, drew at my request: a K and Rarity poster with K's monogram in the upper right. Everyone loved it- I'm going to request one for my son's birthday in December! Won't they look great in the kids' rooms later on?

 
I decorated this plain white cupcake stand myself since I couldn't find anything ready-made on the shelf that fit our theme. I wrapped ruched tulle around the edges, punched some purple flowers out and sewed white pearly beads in the centers, then added some pony characters to the front of the cupcake stand. It turned out super darling! I will have to remember to keep colorful tulle on hand for decorating at all times!


K and I found some star lollipops for only 19 cents each so we grabbed handfuls of them and created little "lollibouquets" for the table. The blue and white swirly pops were leftover from our VHC party earlier this year. My kids don't eat candy very often at home so I needed to get rid of them somehow!


I set up the fashion and beauty boutique on a bench and side table, off the floor, so that the colors of these fun boards would be more visually appealing for the kiddos. I didn't have time to decorate the "shopping bags" but white is pretty chic, isn't it? You can also spy one of the skirts I had made for the fashion boutique in the bottom corner.


The beauty boutique was filled with necklaces, color hairsprays, hair extensions, nail polishes, and face paint. I also hung a picture of the six mane ponies that K colored inside the 'boutique.' 

This pretty monogram decoration is made from foam core painted over several times in gold and bronze. I originally wanted to cut the poster of K and Rarity and put it inside this frame but once I saw the poster, I just couldn't bring myself to cut it. So instead, I put K's monogram inside. I wanted to introduce some gold to the decor since Rarity's house is filled with gold oval framed windows.

For activities, we did some face painting, hair and dress up and also decorated some t-shirts!

Isn't my niece fabulous as Rainbow Dash?

And my sister did such a great job with the hair!

Adorable!

My littlest enjoys his pony ears too. I hot glued all the ears to headbands so they would be easy to put on or take off.


My niece and my son showing off their t-shirts designs. Too darn cute!
And the birthday girl getting ready to blow out her candles! Happy 5th birthday again to my big girl! She truly enjoyed her special day thanks to the help of family and friends! 

Hope you enjoyed these DIY party ideas! Thank you soooo much for stopping by today!


Sunday, September 8, 2013

The My Little Pony Rarity Birthday Dress!


Yay- it's finally here! I've been talking about this party dress since my first post on K's My Little Pony birthday party and now I can finally show you what I've been working on for the past few days.

Here's Rarity, the fashion designing pony that my daughter is obsessed with.
And here's the dress I made. I totally put the diamond cutie mark on the wrong way but K didn't even notice. Ah well- we all know which pony this is, right? 


I love the ruffles around the neckline. It is so girly, frilly, and exactly like Rarity's style. 


I'll be releasing the pattern for this dress later this week, along with a picture tutorial. I'll have sizes 2T/3T and 4T/5T available for this dress. My daughter's dress here is the 4T/5T version. It's slightly big for her because it's going to be used as part of her dress-up wardrobe for some time. 

Check out the little surprise on the back of the dress! The lace trim creates a curly tail effect- and K totally loves it. 


Isn't it fun? The circle skirt is full and swingy without being bulky- perfect for partying or just playing dress up. I gotta admit that the upper half is my favorite part though. I love the ruffled neck and the layered flutter sleeves and how they frame her cute chubby face. Mostly, I love that she loves it. 

Stay tuned for the pattern later this week! I'll make it available on my Fresh Off the Bolt blog in multiple sizes and options- yay! If you want the pattern, follow me there so you get it as soon as it's released! Also, you should go see my adorable striped tunic dress version of this same pattern! It's my favorite- even K's step-dad complimented her about it and that must mean something coming from a guy who doesn't care about fashion, right? =) 


Thursday, September 5, 2013

My Little Pony Birthday Party Decor- Take Two!


For K's 5th birthday, I've been trying to recreate the above picture into a theme! It's been so much fun- mostly because Rarity is so much like me: she loves designing clothes and loves beautiful things! Let's see my progress so far:


Well??? The colors are very similar, aren't they? I knew I wouldn't be able to make it exactly imto Rarity's home on my minuscule budget, but if I could match the color scheme and the lavish patterns then I'd get it close enough so that K can see it coming to life. Nearly 5-year-old eyes are very discerning, I've learned!


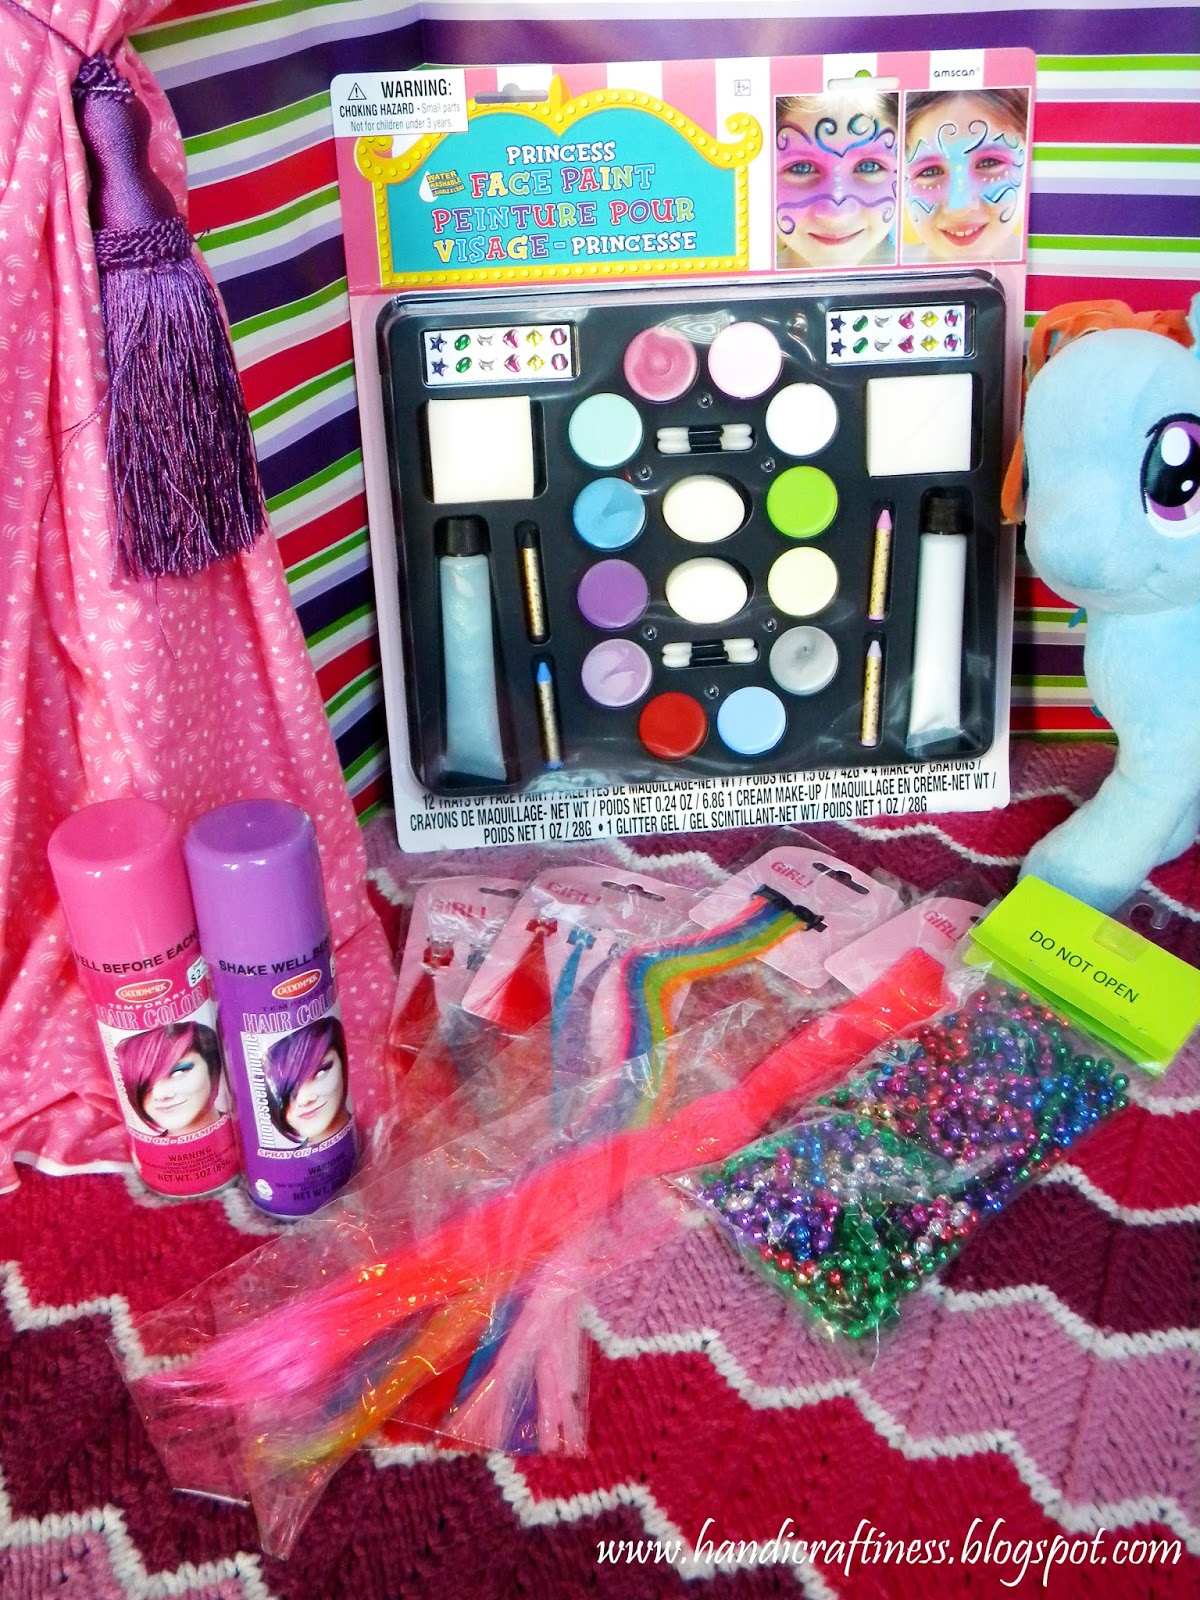
All right, so to the left, we have the "Beauty Boutique" where makeup and hair will be done. I ordered the face paint set from Party City online. I think it was around $10 and I got free shipping too.
Since all the Halloween goodies have already gone up, I picked up some pink and purple hair spray too. The girls will dig this, I know! 


Here's an image of what I wanted to do with the face paint. So pretty, isn't it? I think mommy might need to join in on the fun on party day too!

And to the right we have the "Fashion Boutique!" That's pretty self-explanatory! I'll be using K's dress up rack filled with all the dresses I've made for her and she and the girls will get to mix and match pieces to create their own special looks. I may even just let them go home with them since K has quite a bit of clothes!


I'm calling this a "lanternlier" because it's a lantern made fancy to look like a chandelier. I just put this together yesterday and I'll be pairing it with some paper pompoms and balloons in coordinating party colors. It's gonna look so pretty hanging above the boutique!

This mirror was an awesome find at the Goodwill! It's small enough to hang on the boutique 'wall' so the girls can see their makeup easily.

I cut this necklace holder out of scrap cardboard and K decorated it with MLP stickers. I also cut slits into the bottom so it can slide onto the back board that is the "wall" of the boutique. Isn't it so practical and cute? I like it because the girls will be able to remove the necklaces easily without them tangling up.

All dollar store materials created this sign. The flowers were thrifted though
and I have more that I plan to use to decorate "pony hair" that will go in the party guests' hair. 


This awesome throw will be used as a rug in our fancy little boutique. Thrifted treasure- I love it! Isn't the chevron pattern so modern? And K can still use this in her bedroom after the party too so that was a great $2 spent!


Also thrifted: these fabulous pink and white globe lights! I got three of them for $3 each! Also another item that can be used elsewhere after the party.


And these are just some fun party signs I created for our boutiques. 


I'm getting excited for a party that's not even mine! I have some fun activities planned as well and I'll share those next time as I start to gather my materials. 
I have a special Rarity dress I designed just for my daughter. I'm still trying to find the time to actually sew it together but kids, school, and life just keep getting in between me and my sewing room!
But when I do get it together, I promise to share the pattern with you. I don't know if I will have time for a tutorial but the pattern will still be put up. It's fairly simple and can be customized to be any of the ponies or just an everyday dress! 

Wednesday, August 21, 2013

DIY My Little Pony Party Decor


In less than a month, my K is going to turn 5 and her latest obsession, My Little Pony, was chosen as the theme. Apparently, she's not the only one who's obsessed because when I started doing some more research into the subject, I learned that TONS of people, not just little girls, are equally addicted to these cute ponies. There's even a term to describe such people: bronies. According to Urban Dictionary: The term used to describe the fan community(usually of the older group, males and females) of the show My Little Pony: Friendship is Magic.

So, are you a brony??? =) 

The last couple of nights, I've stayed up well past midnight to make some stuff for her party because I hate paying for overpriced party decor that doesn't even fulfill the vision I have in my head! And believe me, I have a lot of visions and I just can't help but DIY everything because that's the only way I'll get rid of some of those visions and get what I want. Are you other crazy crafty chicks with me here??? I know I can't be the only one. ;-)


All right, so up above, my trip to the Dollar Tree yielded some fun, pony-centric stuff! Aren't those foam signs just perfect??? Keep reading to see what I made with those!

K is obsessed with Rarity, the fashion-designing pony. No surprise there, huh? Just like her mama, that's why! So I figured we would go with a Rarity's Boutique them ~ complete with a fashion store and hair and makeup 'counter.' 


Isn't that foam sign awesome??? So simple but so pretty and fitting for the theme. I forgot to photograph the other sign but it reads "Beauty" for the hair and makeup counter in the boutique.


I'll be using K's little dress up rack to hold dress up clothes for the girls at the party. And yeah, you guessed it, all of those will be handmade by me so I really need to get going on those this weekend!


And don't you just love the tassels??? Super adorable. I tried to recreate Rarity's home (see below) with the pinks and purples and feeling of lavishness and decadence. I used Target's $ spot duck tape and wrapping paper as wallpaper and just colored card stock for the diamond pattern and curtain swag detail. 


How'd I do? They look pretty gosh darned similar, I think! K loves it, especially since she got to help with it.


I bought these tri-fold boards from the Goodwill. They were half off for just $1 each! Big score for me there! Continuing on in my cheap chic vein, the magenta fabric that forms the curtain is from my stash and I have another pink star fabric that I'll be using on the other tri-fold board. Altogether, less than $10 spent on decorations so far! 

Stay tuned because I've got some more decorations, party favors and food ideas coming over the next month, culminating in the final event which is exactly one month away from today and you bet I'll be posting about the shindig afterwards! A year goes by fast, doesn't it mommies??? I still remember her last party like it was yesterday! =(

Oh yeah, and did I mention there'll be a very special Rarity dress made especially for the guest of honor? I'll even offer the pattern for free over on my Fresh Off the Bolt blog! So definitely look for that if you have a little one who's a little Brony. =D 


Friday, August 2, 2013

Bubble Guppies DIY Party Decor

I love planning and decorating kids parties! I think the things you can DIY for them turn out soooo much better than almost anything you can buy! Today, I wanted to share some of the decorations I made for my niece's birthday party coming up this weekend. I love how they turned out and I spent maybe only $10??? Most of the materials I already had on hand and my printer came in extra handy too!


This centerpiece couldn't have been easier or more fun to create! I just printed out the Bubble Guppies characters that I Googled and taped them to popsicle sticks/dowels. Since I only had one tiny piece of floral foam left, I stuck a bunch of yarn balls into the galvanized bucket (leftover from 2 Easters ago) and stuck all my sticks into them. Worked out great! 

Then I layered some teal-colored tulle on top of the yarn to hide them and added shells that the kids and I had foraged on Sanibel Island a couple years ago. The star fish is from a tourist shop on the island.  


I used PicMonkey to make a card of my niece's adorable face and the little birthday sign. I printed it, cut each one out separately and taped them to popsicle sticks and that was it! This stuff is so easy, I wonder why some people bother to spend money buying it???


Then I did the same for some of the Bubble Guppies characters and they got their own decorated cans so they could be placed randomly on the food table. Are you impressed with my little pink seahorse? =)

I placed a roll of bakers twine into each can (they fit perfectly!) and the hole helps hold up each character. Pretty nifty, huh? See- I really didn't have to buy much to make these! I simply used what I had on hand already. 


Super cute- I really love how the table decor turned out!


And check out this cool backdrop I created for the dessert/food table! I used a blue crinkle chiffon fabric from my stash as the curtain and then attached some bubbly circles and seaweed to make it more underwatery. Then I simply taped some printed characters to it and I've got a simple, theme-appropriate backdrop for our party.


And these rolls of fluffy-wrapped floral wire is all I really had to buy! They were only 99 cents each on clearance at Michael's so I bought enough to decorate the food tent to make it look like an underwater grotto or sea cavern or whatever you wanna call it. You totally get what I mean though, right?


What's a party without a photo prop??? Not much of a party, I think! Haha- this one is still in-progress but I just wanted to share how cool it's turning out so far. I used my circle cutter thingy to cut out the "scales" and simply layered them over each other to create the fish tails. I really like the ombre effect on the boy! On the girl mermaid, I placed the patterned circles randomly throughout to make for a shimmering scale effect. Super pretty, I think!


Next week, I'll post a few pics from the party so you can see how the party decor turned out. We'll be at an actual beach so it should be super fun! Stay tuned and have a lovely weekend everyone!