Pages

Saturday, September 27, 2014

A Frugal Frozen Party (for under $20!)

Hi all! Long time no post! I took the summer off to be with my kids and then September came and I had to get a birthday party put together for my daughter! Speaking of which, every little girl's obsession for the past year has been Frozen~ am I right?  So of course, K chose that as her party theme and I decided to make all the decor for it instead of using store-bought stuff. Why did I make so much work for myself? Mostly because I wanted her party to be unique and special to her. I wanted to give her something not seen everywhere else. And I think I accomplished my goal!

Just FYI: I spent around $20 for decorations only by using what I had in my craft supplies and Christmas decorations! I reused a lot of cardboard from last year's My Little Pony party too and I loved the new results! I also printed a few Frozen-themed things off the Internet. I'll include links when I talk about them below.


Get ready to scroll through a lot of photos and be inspired! I'll provide as much info as I can without rambling, I promise!


Our Frozen food table and backdrop was simple but impactful. I reused a trifold cardboard (think science project) that I used in last year's MLP party to create Elsa's ice castle. My kiddos then glued and glittered it and I added the balcony so we could put the paper Elsa and Anna on there. Ultra adorable, right? 
Then you see that banner above? Super cute and free printable from Bakingdom. To give it more oomph, I layered glitter paper behind each banner in Elsa and Anna's colors. I'll post close ups of the banner in a later post. 
Then the blue and white streamers were created by sewing three layers of crepe paper and then pulling on the strings to create the ruffles. They're super pretty and so easy to make. I only wish I had more patience to make a ton more!


I have to apologize for the poor quality of the above picture! I didn't even think to photograph our table decorations so this is the only "good" photo I have of what I created! I made silver snowflake wands with dowels and snowflakes from my Xmas stash then made tulle pompoms in blue and white. I stuck them inside recycled Starbucks frappucino bottles that were wrapped in more glitter paper and Frozen stickers. The snowflake "runner" is from my Xmas stash too~ they're felt snowflakes strung on fish wire so they can hang on the wall or from the ceiling. I also used them in the backdrop of our food table as seen in the top photo!


Initially, I had no idea how I wanted to design the favor bags. I just knew I didn't want them to be like anything else I'd seen on Pinterest or Google. Then as I was looking at the Arendelle sisters' pretty dresses, inspiration struck and I designed these patterns to fit the bag size. I especially love the Anna bag! I debated about adding a cape to the back of Elsa's bag but ultimately decided not to do it. 


The cake was a last minute design too. I wanted to keep it simple like the rest of the party so I created snowflakes using blue candy melts and pressed them into the sides of the cake. Follow this tutorial if you wanna try your hand at them too! 

I then cut a snowflake out of parchment paper, laid it lightly on top of the cake then sprinkled on some blue sugar. My favorite scene from the movie is when Elsa stomps on the ground and the shape of a snowflake is created as the base of her ice castle. See the connection here? The white frosting kind of looks like the North mountain, right? 

The cake is a blue velvet tie-dye cake with whipped cream cheese frosting. I also made snowy French vanilla cupcakes as well. 


One of my only expenses came from the poster book and frames. I bought the Frozen 8x10 poster book from Michaels for $3 after using a coupon. Then the white frames are from Ikea and they are only $2 each. Total= $11! I could've added snowflakes to the frames but since I wanted to reuse them in the future, I left them plain. Good thinking, frugal mama!


I've been wanting to make one of these big block letters forever (and they're all over Pinterest too, right?) but I was intimidated by how difficult it looked. Then I pushed myself to do it and whaddya know?! It's. So. Easy! 

I reused another trifold board from last year's party and used almost every inch of it to make the K. I then wrapped it in yards and yards of blue tulle which I had in my fabric stockpile (from making countless Elsa dresses) and added silver snowflakes from my Xmas decorations. What's super cool about this is that it went straight to her bedroom after the party as a decoration and she loves it!


I saved everyone's favorite for last: our Olaf pinata! I had help from some fabulously creative friends with this one and that's why it turned out as great as it did! They created the forms for me and I taped it together and decorated it to look like Olaf. All the kids loved him and even the adults. I almost didn't want to destroy him but realized I could always make more if needed. =) 

Papier-mache is so fun but it requires patience due to drying time. It took us three days from start to finish for this project! Well worth it though, wouldn't you say? 


And that's it for our Frozen party! Well, except for the food~ sandwiches obviously! And I was even able to use the leftovers for school lunches for the next three days~ so frugal and fab! =) 

A couple of tips from me to you on how to keep party costs low: lots of elbow grease and free printables! I think it is also worth mentioning that it teaches your children to use their imagination to create things they want rather than relying on the stores to provide it for them. My kids definitely enjoyed helping with the ice castle! They are looking forward to the next birthday party already because they love to DIY with me!


Friday, April 4, 2014

Free Tutorial and Pattern for a Portable Felt Board

Just before Christmas, I posted this portable felt board:


And now I FINALLY got my act together enough to post a tutorial WITH pictures! I know, I should give myself a raise. Another free pattern and tutorial in just a one-month span is pretty awesome and over-achieving for me.

I actually got this done just in time for Easter, as planned~ I'll be sewing up a bunch for my kiddos as Easter basket gifts. So I should probably go get started on cutting those felt shapes- it'll be a handful of late nights with my scissors, felt, and Netflix but I think it'll be well worth it! 

Also, for some very awesome quiet book or felt book templates, you should go check out 
www.imagineourlife.com. Plenty of ideas and templates to use if you ever run out of your own ideas!

Download the tutorial with pattern dimensions here. And Happy Easter Sewing to you all!


Friday, March 28, 2014

The Rarity Maxi Dress Inspired by a Reader!


Last September, my daughter had a My Little Pony birthday party and of course, I had to come up with a dress to go with the theme. Her favorite pony is the fashionista Rarity and this is where I came by the name for the dress which, by the way, came as a free pattern in size 4

Here are the original versions of the Rarity:

Woven                                                                           Knit

Well, just recently, a Facebook follower sent me a picture of her Rarity but as a maxi dress and I couldn't believe how freaking ADORABLE it was! So I was definitely inspired to make my own version and my daughter ended up LOVING the longer maxi dress! Who woulda known???


Doesn't it look great? I omitted the flutter sleeves and used piping and ric rac trim on the bodice instead. It's so sunny and summery~ something that just doesn't exist in my party of the hemisphere yet. But at least K will be ready if summer decides to arrive tomorrow!


Did you notice the bodice is slanted upwards on the front? And the skirt mimics that at the bottom front hem as well. The skirt is also a very sheer jersey so I'll need to sew in a lining now. I had hoped the gathers would help but they didn't!


Overall, I LOVE this maxi dress! I'm so happy Caroline shared the idea with me on Facebook! Maybe I'll offer this version as a free pattern this summer. Or you can use the one I already have and make your own adjustments to the bodice as I have. It's so fun to create new versions out of a simple pattern like the Rarity dress- and the results are very satisfying!


If you've made different variations from a dress pattern I've made, I'd love to see it! Share with me on FB so everyone can have a look-see and be inspired! Thanks a million for reading!

Sunday, March 23, 2014

My 100th Blog Post Celebration: Free Spring Dress Pattern, Anyone?


This is officially my 100th post- woohoo! I can't believe I'm still going. I feel guilty sometimes about not posting consistently but seriously- this is for fun and so I can do it only when time away from three kids allows me to. So no need for guilt, right?

I've stopped posting over at Fresh Off the Bolt since I've realized it's just very odd and difficult to continue two blogs about my creative endeavors. I've decided to keep it online since I have some tutorials and patterns still floating around over there. But from now on, it'll just be this blog, Handicraftiness, that'll hold all my creations.

Anyway- back to the point of this 100th post: I'm celebrating by offering my Bella dress pattern for free!


The Bella dress pattern is available in 12-18 months to 5Y with more sizes coming soon! The bodice is fully lined and the skirt length is adjustable to however long or short you want it to be. You could make it into a peplum top or drop waist dress. You can mix and match fabrics which I love to do. You can even add pockets or appliques to make it special.


I love that it comes together in just a few hours~ I made five dresses over a 3-day period during my son's naps and after his bedtime. I am impatient so instant satisfaction is very gratifying.

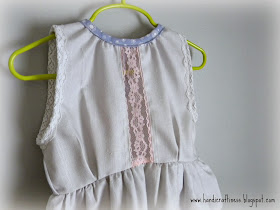
I highly recommend mixing and matching fabrics for the prettiest effect! The blue/gray dress above uses woven organic cotton, lace, and chiffon and it turned out to be one of my favorites! I haven't tested this pattern with knits yet but I think it would be okay to use for the skirt. Speaking of the skirt, I extended K's skirt to 14.5" so it would hit just below the knee. She's growing tall very fast so I wanted this one to last through the summer at least!


UPDATE: I've decided to indefinitely allow free downloads of this popular dress. Download it HERE and HERE and let me know how the sewing goes!

Happy Spring Sewing and thanks so much for reading!

P.S. Share your Bella dress HERE in the Bella Flickr Group! I'd LOOOOOVE to see the myriad of combinations that can be made from this pattern! See you there! =)


Friday, March 7, 2014

A Frozen Dress~ Queen Elsa's to Be Exact!

The Oscar-winning animated movie, Frozen, is inundating my home and family life thanks to two of my kiddos who are obsessed with each of the unique characters in the movie. Wait---I bet if you have young children, especially girls, you're probably going through the same thing, right? 

Frozen is extremely popular~ and it's Queen Elsa in particular who has captured pretty much everyone's fancy. So much so that an Elsa dress costume on Amazon can be bought for anywhere between $400-$900! Crazy, isn't it?! And even in all the big box retail stores, it's difficult to even find an Elsa doll or dress because they sell out within hours of being restocked. Frozen's Queen Elsa is one hot commodity but I'm not putting down a mortgage payment's worth of dough on a costume despite that obvious fact.

Now this is where my sewing skills come in handy~ sorry for all you non-sewing enthusiasts with little girls. I decided I wasn't having any of that nonsense on Amazon and drafted my own Elsa dress for K. I completed it in time for the DVD release later this month~ check it out:


Thanks to Ebay, I was able to find the snowflake iron-on decals and the sequins were already in my craft stash. They make the dress more Elsa-y, right? I was planning to randomly sew sequins on the tulle over skirt but that would've taken me another two weeks worth of late nights and if there's anything I appreciate nowadays, it's a good night's sleep! 

I gotta go sew up three or four more of these Elsa dresses~ it seems nobody else wants to shell out $400-$900 for a costume dress either! =) Thanks for stopping by!


Sunday, February 16, 2014

Results of My Recent Sewing Frenzy- Part 2

As promised, here's part two of my recent sewing frenzy. I'd had too long of a creative dry spell- can you tell? Make sure to check out part one of my sewing frenzy here. Lots of adorable girly outfits all inspired by my beautiful nieces and of course, my daughter.


I made this dress for K as a Valentine's Day gift. She is obsessed with hearts and the heart printed knit top is adorable without a complete pink overload.


The tulle overskirt is layered above a mint linen underskirt. It gives it a romantic, floaty feel. I created the lace flower brooch by gathering two different lace trims and layering the smaller one over the larger. Then I simply glued on a piece of felt and a pin back so that it can be removed when the dress goes in the wash. 


These lilac dress/tunics are beautiful but K did not like them at all! I really wonder what she sees when she looks at them. Hmm...the mind of a 5-year old! Anyway- I thought they were great since I designed them myself but I think I made a mistake giving her the heart dress first before showing her these two beauties. 


I created these two in a size 4/5 but will now have to sell them since she refuses to wear them. Pooey! I always feel like the time and materials go to waste when the kids refuse to wear what I make but I guess I could just chalk it up to more sewing experience under my belt, right?


They'd be great layered over leggings, wouldn't they? Let me know if you'd want them. I'm going to hold onto them in case K changes her mind as she is sometimes wont to do. Seriously- girls change their minds more often than they change clothes, right? So- I may yet get to see her in one of these come spring, at least I'm hoping anyway!


Wednesday, February 12, 2014

Results of My Recent Sewing Frenzy- Part 1

These outfits are available for sale here!  And while you're there, like my FB page to find out when I'll be releasing these patterns so you can sew them up yourself! Thanks for stopping by!


I've been busy drafting patterns and sewing for the past few weeks and I've got some fun stuff to share! I've had plenty of inspiration from my nieces, including one who isn't even born yet, and what I've got so far is what I'm going to call my spring-inspired girl's apparel. I'm actually hoping to make a business out of this one day, so let me know what you think! Without further ado...


I'm calling this first outfit, the Harmony, after my soon-to-be-born niece. I drafted it in a 9-12 month size and I fell in love with the results so I'll be making this one in bigger sizes. 


I love lace, ruffles, and pleats and those are all present on this little top without making it look too busy. I also love bubble shorts for girls and these chambray striped ones go so well with the Harmony top. 


This next one is a vintage floral peasant top with magenta corduroy bubble shorts. I'm calling it the Cadence outfit. I love the sweet vintage vibe of this outfit so much but I'm so sad that I no longer have anymore of this floral fabric left! I bought it on a thrifting expedition and had been holding onto it for a wee bit too long. It's hard to cut into beautiful fabric- it really, truly is!


But I'm happy that cutting into the fabric resulted in such a beautiful little top at least!


And of course, a touch of vintage lace trim on the bottom hem gives it the perfect amount of sugar.


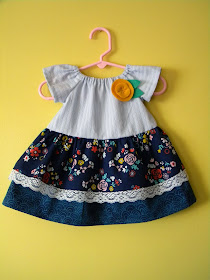
And I don't have a name yet for this baby peasant dress but isn't it just adorable?! I love mixing fabric prints and this one outfit alone has three. 


The bodice is made from a men's cotton dress shirt! I love upcycling material- saves money and the environment!


I'll also be drafting this dress in bigger sizes because it's just so sweet!


And how could I leave out leggings? It's become a staple in every girl's wardrobe these days. The colorful Navajo-inspired knit fabric is just fun and graphic! I paired it with a mustard-colored knit from my remnant pile and it looks pretty modern and fab, eh?


I love this set- especially the top- and will definitely be sewing up bigger sizes! This set is about an 18-24 month size. 


Just in case you're curious, my sewing frenzy stemmed from a long creative drought. I recently returned from a very long blogging hiatus in which I didn't sew a stitch for three months! And yes, this is what happens when I resurface, ha! 

I've still got more to share with you, too- didn't you notice the title said "Part 1?" Part 2 has some more dresses and tunics in some lovely shades of lilac, gray, mint, and cream and are all self-drafted patterns that were finally released from my imagination. Can't wait!


This post is linked up at Make It and Love It's linky party. See it here!